 “Search Engine Optimization,” which is the art of getting your website content to show up in the results of search engines like Google when people search for specific terms, is often overlooked by radio stations. SEO is a critical component of any digital strategy. I would argue that it is as important to pay attention to your radio station’s SEO strategy as it is to pay attention to your radio station’s Facebook strategy.
Why do you invest time and energy into making sure that your website content can be found on Facebook? Because lots of your listeners use it.
Why should you invest time and energy into making sure that your website content can be found on Google? Because lots of your listeners use it.
Yet SEO can be intimidating. An entire cottage industry has popped up around search engine optimization. You can hire a company to go through all of your website content and optimize it for you. But if you can’t convince your GM to make this expenditure — or if your station is not producing enough website content yet to justify the cost — there is a WordPress plugin that can help you with the basics.
The Yoast SEO Plugin
Yoast SEO is a popular WordPress plugin, which means that your station’s website will need to be built on the WordPress platform to take advantage of it. Yoast actually offers a handful of plugins, including ones to optimize videos, commerce websites, and local businesses. They also offer a premium version of their plugin. I recommend that you start with the free version of the regular plugin and, once you get the hang of it, decide if you want to upgrade.
What exactly does the Yoast plugin do? It does a lot — it’s quite powerful! — but in this column, I am going to focus on its ability to control what people see when your content is shared on social media or found in search engine results. Here are the basic steps:
1. Install the Yoast Plugin and Configure the Sitewide Settings
Your web developer can quickly install the Yoast plugin just like they would install any other website plugin. Once they do, they can navigate to the plugin’s settings page by clicking on ‘SEO’ in the dark left-hand column in the WordPress backend. Your webmaster can go through each tab one at a time. Most of these settings are intuitive, but there is a Configuration Wizard and plenty of support documentation if you need it.
2. On Individual Pages and Posts, Get in the Habit of Configuring Your SEO Settings
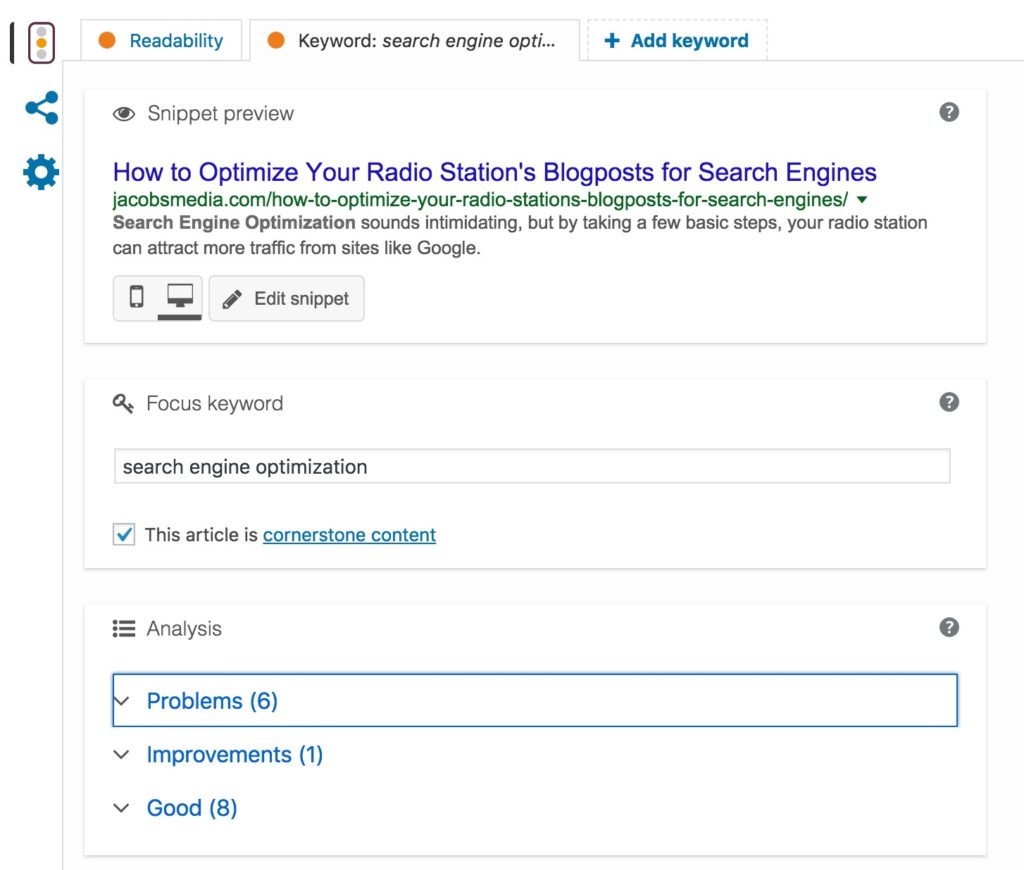
Now that the plugin has been installed, you will see a new box in the WordPress backend of your posts labeled “Yoast SEO”:

Here, you can control what shows up in Google, Facebook, and Twitter when this particular webpage is found there. Note the three icons to the left: Three vertical dots, the ‘Share’ symbol (three dots connects by lines), and a gear.
Google Settings
When you click on the three vertical dots, you can control how your page will appear in Google search results. The ‘Snippet Preview’ shows you how your page will appear in Google. By default, the plugin will pull the first several words from your post. However, you’ll want to write a concise summary of the post to be used instead. Click the ‘Edit Snippet’ button, and you can type in the summary you want Google to use. A colored bar will turn red to show you if your summary is too long.
You can also control the headline that Google uses here. By default, the plugin uses the title of the blogpost. However, there are circumstances in which you may want to use a different headline. For example, you want “keywords” — the words people are likely to type into Google when looking for content like yours — to appear in the headline. This increases the chances that your content will show up in Google’s search results. If they are not already in the post or page’s title, you’ll want to include them here.
In fact, if you enter “Focus Keywords” in the ‘Analysis’ section below, the plugin will tell you how you can improve the likelihood that your content will appear in Google’s search results. It will identify ‘Problems,’ suggest ‘Improvements,’ and tell you what’s ‘Good’ about the post.
On our blog, Fred often uses artistic titles. For example, he might write a blogpost about The Beatles called “Remembering the Fab Four.” This title makes sense when you see it within the context of our website, but it is unlikely to show up in Google’s search results because most people will search for “Beatles,” not “Fab Four.” So we want to use the Yoast plugin to change the headline that appears in Google to “Remembering The Beatles” without changing the headline that appears at the top of our webpage. We can do that here.
Social Media Settings
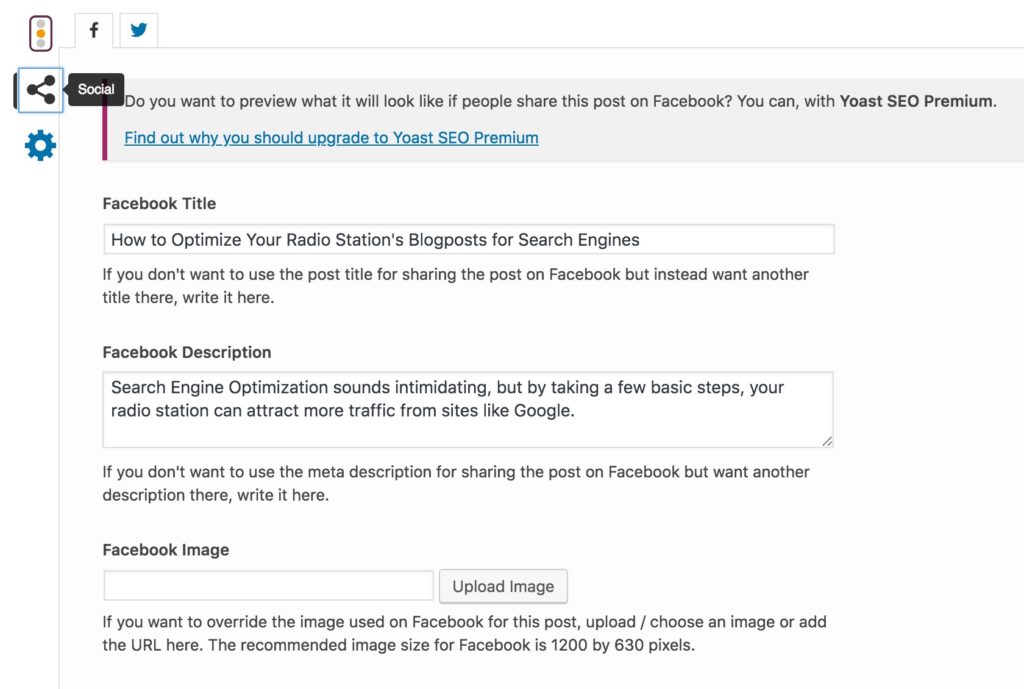
When you click on the ‘Share’ icon, you get to the social media settings for your post or page. Here, you can control what appears when this webpage is shared to Facebook or Twitter. In addition to the headline and the excerpt, you can also control the image that is used. By default, the Featured Image is used for social media. However, for really important pages — such as a page about your radio station’s big annual concert — you may want to use images that are the ideal sizes for each social network (1200 by 630 pixels for Facebook and 1024 by 512 pixels for Twitter).

Advanced Settings
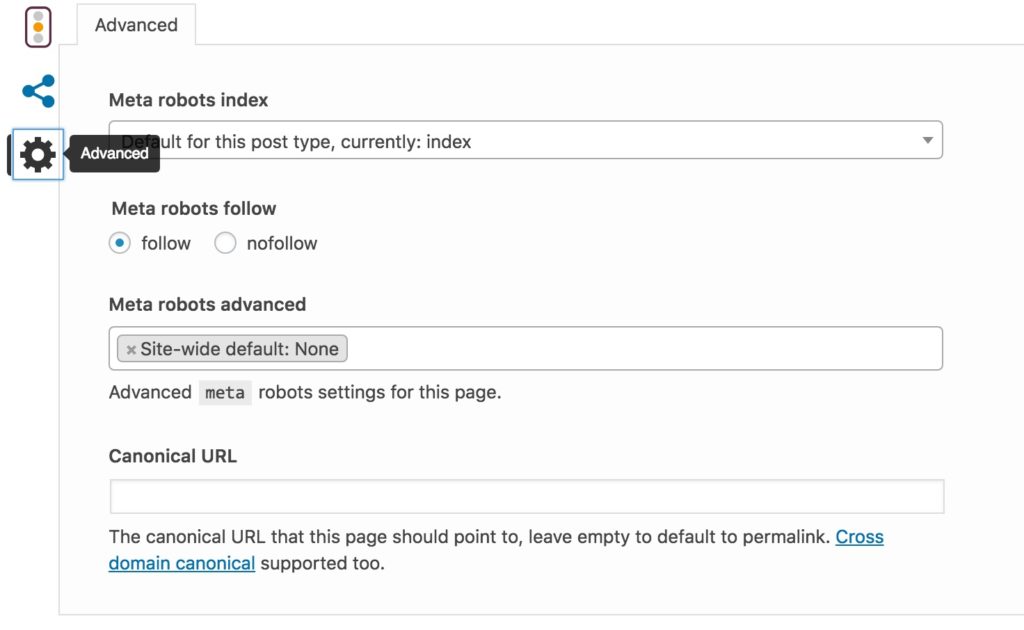
Finally, if you click on the gear icon, you’ll find the ‘Advanced Settings.’ The ‘Meta Robots Index’ allows you to decide if this particular page should be indexed by Google. I often set pages that I don’t want to be seen by the general public to “No Index.” For example, you may want to do this with any pages that are only meant to be seen by clients.

There’s a lot more that the Yoast SEO plugin can do, but by taking an extra minute to configure these settings every time you publish new content on your website, you increase the likelihood that your content will appear in search engines, and the likelihood that people will click through to your content when they see it on social media.
More Digital Tips
- Intro to SEO for Radio Stations
- Radio DJs Get Feedback, Podcasters Don’t. Will That Change?
- “Live and Local” Radio Is Not The Same As Community Building
- How the Tools in Your Radio Station’s Digital Strategy Fit Together
- 5 Ways to Help Radio DJs Avoid Writer’s Block When Blogging
- A Simple Digital Treat to Thank Your Radio Listeners This Thanksgiving - November 13, 2023
- Interview Questions When Hiring Your Radio Station’s Next Digital Marketing Manager - November 6, 2023
- A Radio Conversation with ChatGPT: Part 2 – Promotions - October 30, 2023


Leave a Reply